Managing AWS SQS Dead-Letter Queues: Searching and Redriving Messages
Introduction
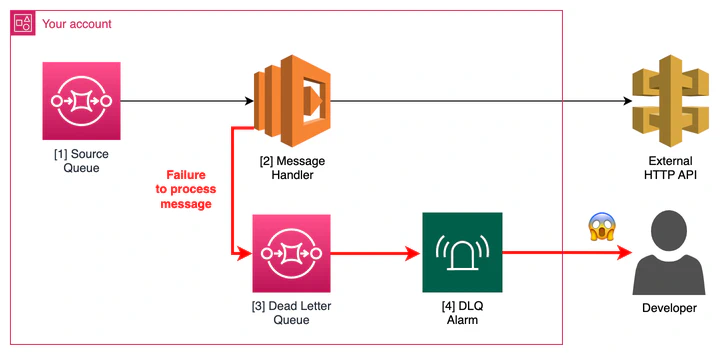
Amazon Simple Queue Service (SQS) is a fully managed message queuing service that enables you to decouple and scale microservices, distributed systems, and serverless applications. A critical feature of SQS is the Dead-Letter Queue (DLQ), which is used to handle message failures. When a message can’t be processed successfully by a consumer, SQS can move it to a DLQ to be analyzed later, preventing the system from getting stuck on a poison pill message.
In this post, we’ll walk through how to search for specific messages within a DLQ and how to “redrive” them back to the main queue for another processing attempt.
Why Use a Dead-Letter Queue?
- Isolate problematic messages: DLQs isolate messages that cause errors, allowing your main application to continue processing other messages without interruption.
- Debugging: Failed messages can be inspected to debug the root cause of the failure.
- Message recovery: After fixing the underlying issue, you can redrive the messages from the DLQ back to the source queue to be reprocessed.
Searching for Messages in a DLQ
Unfortunately, the AWS SQS console does not provide a direct way to search for messages based on their content. You can only view the messages currently in the queue. To find a specific message, you typically have to poll the queue and inspect the messages one by one.
Here’s the general process using the AWS Management Console:
- Navigate to the SQS Console: Open the AWS Management Console and go to the SQS service.
- Select Your DLQ: From the list of queues, select your Dead-Letter Queue.
- Poll for Messages: Click on the “Send and receive messages” button. In the “Receive messages” section, click “Poll for messages”.
- Inspect Messages: The console will display the messages it has polled. You can click on a message to view its body, attributes, and other details. You may need to poll multiple times to find the message you’re looking for, as SQS does not guarantee the order of messages.
For a more programmatic approach, you can use the AWS CLI or SDKs to receive messages and filter them based on their content or attributes in your code.
Redriving Messages from a DLQ
Once you’ve identified the cause of the message failures and deployed a fix, you can redrive the messages from the DLQ back to the source queue.
- Navigate to Your DLQ: In the SQS Console, select your Dead-Letter Queue.
- Start DLQ Redrive: Click on the “Start DLQ redrive” button.
- Configure Redrive:
- Source Queue: Your DLQ should be pre-selected.
- Destination: Choose the original source queue as the destination.
- Redrive Speed (Optional): You can configure the speed at which messages are moved back to the source queue to avoid overwhelming your consumers.
- Confirm Redrive: Review the settings and click the “Start DLQ redrive” button to begin the process.
The messages will then be moved from the DLQ to the source queue and will be available for your consumers to process again.
Proactive Monitoring with CloudWatch Alarms
A best practice when working with DLQs is to set up monitoring to be notified as soon as a message lands in the queue. AWS CloudWatch allows you to create alarms that trigger when the number of messages in your DLQ exceeds a certain threshold (e.g., greater than 0).
Here’s how to set up a CloudWatch alarm for your DLQ:
- Navigate to CloudWatch: In the AWS Management Console, go to the CloudWatch service.
- Create an Alarm: In the left navigation pane, click on “Alarms” and then “Create alarm”.
- Select Metric: Click “Select metric”. Find SQS in the list of services and then choose “Queue Metrics”. Select your DLQ and the
ApproximateNumberOfMessagesVisiblemetric. - Configure Alarm:
- Statistic: Choose “Maximum”.
- Period: Select an appropriate time frame (e.g., 5 minutes).
- Threshold type: Static.
- Condition: Whenever
ApproximateNumberOfMessagesVisibleis “Greater > 0”.
- Configure Actions:
- Choose an existing SNS topic or create a new one to send notifications to your team (e.g., via email or Slack).
- Add Name and Description: Give your alarm a descriptive name and an optional description.
- Create Alarm: Review your settings and click “Create alarm”.
With this alarm in place, your team will be immediately notified when a message fails processing, allowing for a much faster response and resolution.
Conclusion
Dead-Letter Queues are an essential tool for building robust, fault-tolerant applications with AWS SQS. By understanding how to inspect, redrive, and monitor messages in a DLQ, you can ensure that no message is permanently lost and that you can recover from processing failures gracefully.